Tuesday, May 27, 2014

Rigging, Skinning and Animating a Non Playable Character

  Have you ever played a video game and wonder to yourself how do they get players to move, how do they go about doing animations? When I was a kid I was fascinated with a lot of things video games had done, such as animating things in games but more importantly animating characters. From using 3ds max and Unreal engine a lot of questions became answered such as me finding out you didn't have to animate a character's movement in all directions. Recently after learning about Anim trees in Unreal Engine 3 I decided to take it as an opportunity to challenge myself and create my own Non Playable Character in order to gain more experience with establishing a base foundation for a character in a game. The Non playable character I decided to model was a music note that actually fitted in a level I was creating for one of my assignments in school.
After modeling the music note, I begin rigging it; starting off with a CAT Parent found in create>helpers>CAT Objects.
The CAT Parent can be seen as something that creates a starting bone for your model, being the Pelvis. With the Pelvis, you can create even more bones, such as legs, arms, or even a spine. Creating bones for your models allows animating of the model to be much more easy proficient because you don't have to grab the models by polygons, vertices or edges which could potentially create a lot of issues when animating such as stretching of the model and textures.
One of the things I learn from my own experience with using 3ds Max is that you can actually place the CAT Parent any where you want your model to begin animating at. For this model, I decided to place the CAT parent towards the beginning of the body because thats the part I want my model to animate at. After creating the CAT Parent I began creating the bones for the music note by starting off with Create Pelvis. Once creating the Pelvis I decided to add a spine because essentially the bones were taking place in the music notes body. After adding the spine I decided to add a left arm to my model to be able to animate the curve that was sticking out of the body.
 Upon creating the base bones for my model a begun scaling the bones to get to almost exactly fit my model.
Doing so completed the rigging portion for my music note. When it comes to rigging a character for a game or even for an animation, the rigging portion is just for establishing base bones for that model that can be use for manipulating when animating. However when rigging your model, the bones you created aren't actually attach to the model. So the question is, how do we have the model became manipulated from the bones? Well thats where skinning comes in! Skinning your model is two things, attaching the bones to the model, and modifying weights to prevent any stretching in the textures. After completing the rigging of my model I begun skinning it by clicking the music note going to modify>Skin in the modify list. Once doing that you want to attach the bones to the model by going to the bones section and hitting "Add Bones".

Now once doing that I immediately stop with the skinning.....for the moment and went to animating because you can't really determine any stretching in your model until you see some sort of animation going about. Considering this model was an AI I begin animating the movements for it; starting with the left movement. Usually you can just click which ever bone you want to move for animating and go to the motion tab to create an animation layer and adjustment layer, for this instant I moved or rotated the second HUB which was the top most bone of the model. When it comes to animating things, what I like to do is hit the Auto key when in the adjustment layer and adjusting the bone to my liking. The great thing about the Auto key is that it keys whatever movements made in the animation timeline which I find much faster versus Set key. Considering I'm creating the movements for my music note in all directions I begun animating with the left movement first. For this model animating movements were very easy. All I had to do really was rotate the HUB0002 left in the y axis in a given frame in the animation timeline and rotate it right in the last frame of the time line.

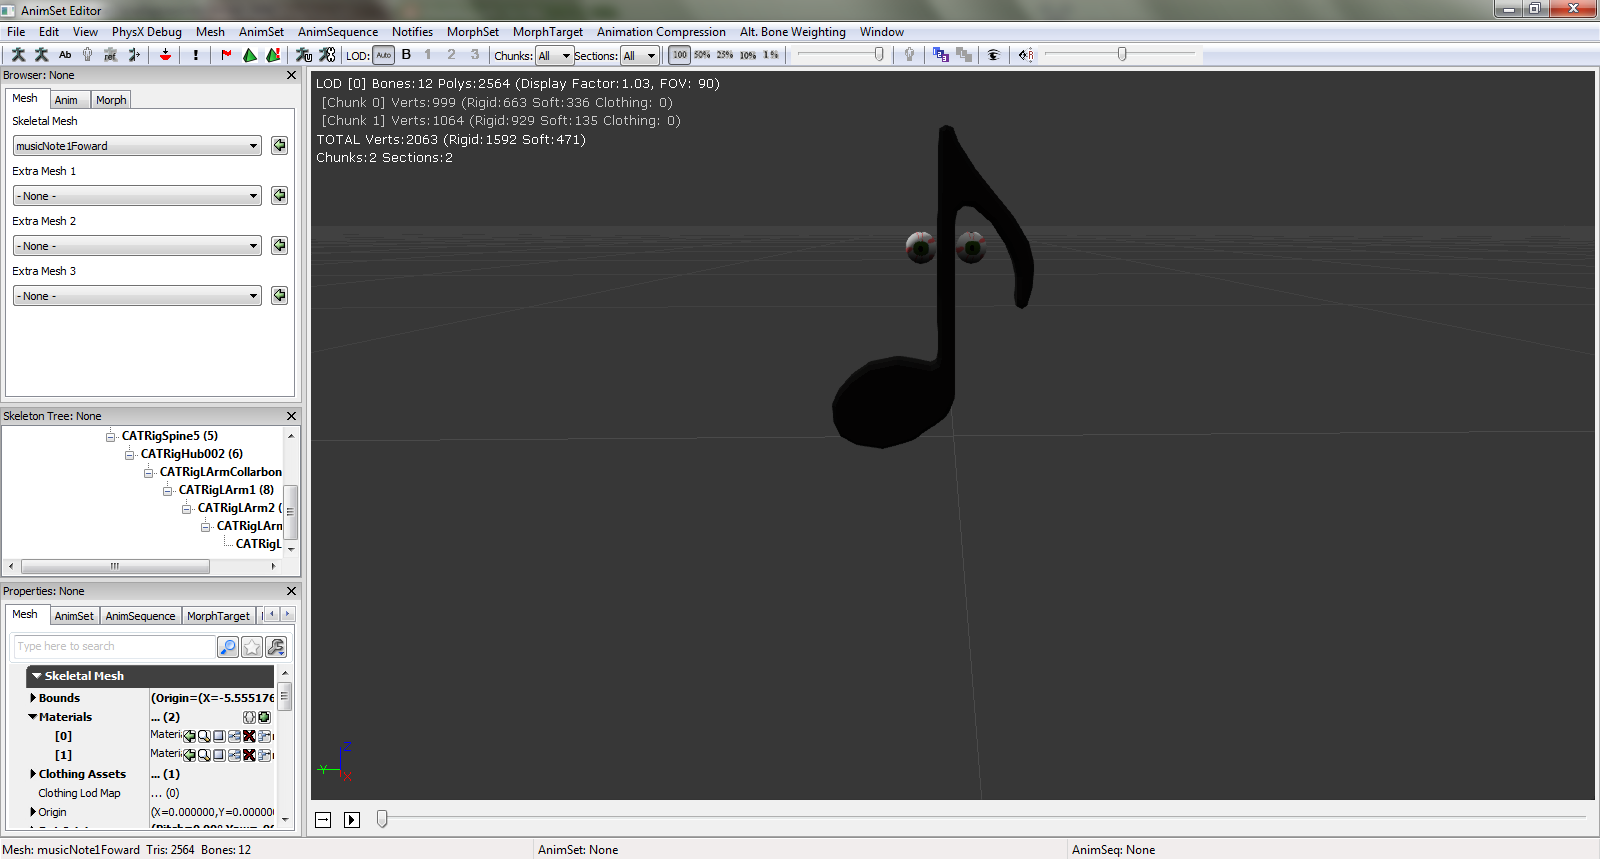
Doing so completed a portion of my animations for the music note model, considering I still needed the right movement, back movement and front movement. Once completing one of the animations for the model I went back to skinning. Upon watching the model animate I actually notice the eyes stretching which is pretty strange because before rigging, skinning, and animating this model, I never knew the model could stretch when animating. I actually thought only the textures were possible in stretching. After noticing this I begun adjusting the weights on the bones, making sure while the animation was playing, no stretching were occurring.

As you can see above, the red capsule represents the weight of the bone and blue and yellow color represents the weight of influence. Before, the influence was actually touching the eye which was causing the eye to actually stretch. To prevent this two things could be done, rescaling the weight capsule or painting weights. Oddly enough, scaling down the weight actually wasn't reducing the influence so I had to paint the weights down to prevent the influence from touching the eye. After doing this completed the skinning portion for the model and thus I begun to continue animating the model's movement in other directions.

With this you begin to see how it is to rig, skin and animate a Non playable character for a game and different kinds of techniques you can use to actually do so. For me I found it pretty fun to do and a way to gain more experience when it comes to creating Non playable characters for a game.
Monday, May 12, 2014

Setting up bounding boxes


  As a person that has a lot of passion in making video games and as a person that is going for a bachelors in game programming, one of the things I've always question myself out of curiosity is how complex is it really in creating bounding boxes for a model. After taking the course "Physics with Programming" as a future game programmer, a lot of things came up to mind as I learned about how in depth you can get with collision detection and collision resolution. One of the things I remember asking in my Physics with programming class was if we had a polygonmesh, would it be possible to detect collision and resolve collision for that polygonmesh with considering every single polygon on that model? Now as you begin to think about the question you have to consider how complex of a model where talking about because in the game run loop, with every tick you're checking for collisions. Considering this you can see if we have a deluge of polygons on a model, it could potentially slow down the processor on your computer due to the high volume of frequent collision checks. Due to this reason, we create bounding boxes for our models.

  Now you may ask yourself what is a bounding box and how is this suppose to relate to 3ds max? Well first off, a bounding box can be a simple shape or multiple shapes that cover an object. These shapes that are used to cover the polygonmesh are typically for collision detections. So as you can see with something like this we can prevent a number of collision checks occurring in the game run loop with using bounding boxes. The whole point of a bounding box is to be used for collision detections as well as be used for simplifying the amount of collision checks in a game run loop. After learning about this is my Physics with programming class I begin to question, well how do we even create bounding boxes for a model? Somewhere in Unreal Engine 3 I remember that they had a built in automatic system that creates bounding boxes for you. 


  As you can see above, the green line that forms a box is the bounding box that covers the static mesh, being the door. In the second photo you can see Unreal's built in system that allows you to create a very simple bounding box for your model. Which is cool and all but it creates some issues. Some of the issues going this route where you decide to use Unreal's built in bounding boxes are that you won't get as precise bounding boxes that match your model. So, have you ever played a game before where you collide with a wall or fence and it looks like you're not even touching the wall or fence yet? Well the reason behind this is because of the way the bounding box was set up. As you look at the picture's above you can see how our simple bounding box is literally a box which creates a problem for our door because our doors shape isn't a box. Looking up at the top right and top left corners of the door, there's a huge area where the bounding box covers. So if for some crazy reason a player manage to hit those spots (oddly enough) it would look unrealistic because they would be hitting a random area of space and not the actual door. Due to this reason, you typically want to create your own bounding boxes using 3ds max because then you can get as precise as you want.

  Now crazy as this is going to sound, I didn't think it was going to be this simple but it is. Creating bounding boxes on 3ds max is insanely easy and I really want to emphasize on that. From taking my Physics with programming course I was thinking things were going to get really complicated but it doesn't! Let's say you created a model on 3ds max and give it a name such as "ToonTree". All you have to do is literally make shapes covering your model to what you think best fits and name those shapes "UCX_ToonTree". So those bounding shapes you creates should have the name of the model you made starting with "UCX_". 

After that exporting and importing, Unreal Engine 3 recognizes these shapes as bounding boxes, so when you import into Unreal, those shapes you made to cover your object won't appear but will be there as bounding boxes. The great thing about going this route is you can literally make these bounding boxes match the shape of your model as close as you want. You basically have more control. Another great thing is the fact the these bounding boxes can be illegal geometry and overlapping each other. So you don't have to worry about man.... Gotta make sure these stay as quads or triangles.

  The first model I made with bounding boxes on 3ds max was actually a cartoonish tree. 

When making the bounding box, I purposely tried getting it to the shape of my model as close as possible to give me some practice although my model was 164 polygons.

 Now keep in mind, when creating bounding boxes, you don't want to go crazy with the polygons and you definitely don't want to grab a character model's polygons and hold shift while scaling to create an exact copy letting that be the bounding box. When creating bounding boxes you want to keep in mind that it should be not high on polygons. One of the things I do recommend is when creating models, definitely do some experiments when creating bounding boxes, have some boxes overlap and even try to make a bounding box match your shape in the least amount of polygons. Doing so will allow you to become more of an expert in creating bounding boxes for models.